Introduction to GCP Cloud Functions and How to Run Node.js Code
Thank you for your continued support.
This article contains advertisements that help fund our operations.
Table Of Contents
This article introduces GCP's Cloud Functions and how to run Node.js code.

Cloud Functions has now been renamed to Cloud Run functions.
Please note that the content of this article may be outdated.
Introduction
This article aims to be:
- Accessible even for beginners
- As clear and concise as possible
- An opportunity to learn by interacting with Cloud Functions
What is Cloud Functions?
Cloud Functions is a service provided by Google that allows you to deploy functions (events) in the cloud.
Being serverless means there is no need for infrastructure management, allowing you to run code simply by coding.
Similar services include AWS Lambda.
How to Use Cloud Functions
Install Firebase CLI
Install the Firebase CLI using the command:
npm install -g firebase-toolsCLI stands for Command Line Interface, and it allows you to execute more commands on your computer.
By installing this, you'll be able to use various commands starting with firebase.
Prepare Firebase
Please register on this page and follow the steps: "Go to Console" → Create a Project → Create with the name "testapp".

Create Cloud Functions
Create a directory and run commands in that directory.
Log in to Firebase
firebase loginYou will be prompted for your login information, so enter it and proceed.
Initial Setup of Firebase Project
firebase init1. Select Services You Want to Use
?Which Firebase CLI features do you want to set up for this folder? Press Space

to select features, then Enter to confirm your choices. (Press <space> to selec

t, <a> to toggle all, <i> to invert selection)

❯◯ Database: Deploy Firebase Realtime Database Rules

◯ Firestore: Deploy rules and create indexes for Firestore

◯ Functions: Configure and deploy Cloud Functions

◯ Hosting: Configure and deploy Firebase Hosting sites

◯ Storage: Deploy Cloud Storage security rules

◯ Emulators: Set up local emulators for Firebase features
In this case, move the cursor to the third option from the top, "Functions," and press the space bar.
Once selected, proceed to the next step by pressing Enter.
2. Answer About the Project
?Please select an option:(Use arrow keys)

❯ Use an existing project

Create a new project

Add Firebase to an existing Google Cloud Platform project

Don't set up a default project
Since a new project has already been created, select:
Use an existing project3. Select from Project List
On the next screen, a list of projects will be displayed; select the "testapp" project you just created.
4. Select Language
?What language would you like to use to write Cloud Functions?(Use arrow keys)

❯ JavaScript

TypeScript
Choose JavaScript.
5. Use ESLint
?Do you want to use ESLint to catch probable bugs and enforce style?(y/N)ESLint helps catch syntax errors.
Press y.
6. Prompt to Run npm install
Do you want to install dependencies with npm now?(Y/n)Since it will install various dependencies, choose Y.
The project structure will be created under the directory you just made!
Let's open it in VS Code.
Writing Code
Files to Modify
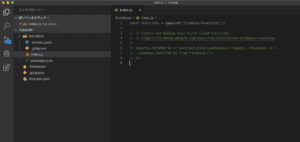
The file we will edit is functions/index.js.
Edit index.js
const functions = require("firebase-functions")

// // Create and Deploy Your First Cloud Functions
// // https://firebase.google.com/docs/functions/write-firebase-functions
//
// exports.helloWorld = functions.https.onRequest((request, response) => {
//   response.send("Hello from Firebase!");
// });
You should see a similar snippet, but uncomment the following part:
exports.helloWorld = functions.https.onRequest((request, response) => {
  response.send("Hello from Firebase!")
})
In the terminal, run:
firebase serve --only functions✔ functions[helloWorld]: http function initialized (http://localhost:5000/testapp-80832/us-central1/helloWorld).
i functions: Beginning execution of "helloWorld"
i functions: Finished "helloWorld" in ~1sIf you see this output, you're good to go.
The displayed URL is for local execution, so click on the link to open it.
Hello from Firebase!If you see this message, the function executed successfully.
How to Write Your Own Code
response.send("Hello from Firebase!")This is the content that was outputted earlier.
So, let's modify it a bit:
response.send("うおおおおおお")
console.log("uoooooooooooo")
Now, refresh the earlier URL, and you'll see the output has changed!
The content of console.log will be outputted in the terminal:
i functions: Beginning execution of "helloWorld"
> uoooooooooooo
i functions: Finished "helloWorld" in ~1s
Once you understand where to write code and how to execute it, you can write the processes you want to perform.
What is request?
exports.helloWorld=functions.https.onRequest((request, response) => {
  console.log(request)
}
The request here contains information such as parameters when the URL is accessed.
What is response?
The response is used to specify what to send back.
response.json({ message: "Hello, World!" })
response.status(404).send("Not Found")
response.sendFile("/path/to/file")
response.redirect("/another-route")
response.set("Content-Type", "text/plain")
response.end("Finished")
By specifying an HTML file in sendFile, you can also create a page.
Conclusion
That's all.
I hope this helps someone.


