How to Add phpMyAdmin to a Dockerized Laravel Project
Thank you for your continued support.
This article contains advertisements that help fund our operations.
A guide on how to add phpMyAdmin to a Dockerized Laravel project.
関連動画
Related Video
This is a video where we actually tried out the content from the article! If anything is unclear in the article, please check out the video.
The video provides further explanations and demonstrations, so it should be helpful.
Subscribe to Our Channel
If you found this video helpful, please consider subscribing to our channel or giving it a thumbs up! It really motivates us to create more content.
Questions and Feedback
If you have any questions or feedback regarding this article or the video, feel free to leave them in the comment section of the video. Your input is greatly appreciated and will help us improve our content in the future!
Introduction
This article is intended for readers who:
- Have already set up a Laravel project using Docker.
If you’re planning to create a Laravel project with Docker, please refer to the following article:
How to Set Up a Laravel 11 and PHP 8 Environment with Docker
Conclusion
To implement this, edit your docker-compose.yml file as follows:
phpmyadmin:
  container_name: "phpmyadmin"
  image: phpmyadmin
  restart: always
  ports:
    - 8980:80
  environment:
    - PMA_HOST=db
    - PMA_USER=user
    - PMA_PASSWORD=password
Then, run the following command:
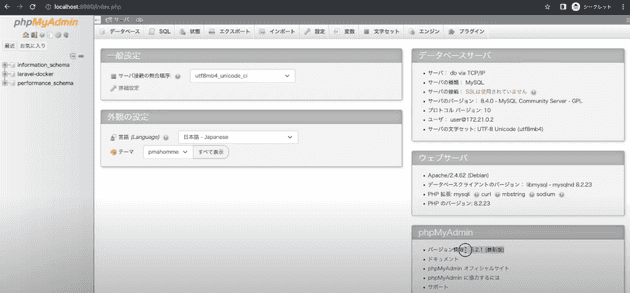
docker compose up -dOnce the build is complete, you can access phpMyAdmin by visiting the following URL in your browser:
localhost:8980If you can see the phpMyAdmin screen, the setup was successful.
Benefits of Using phpMyAdmin
phpMyAdmin is a convenient tool for database management.
It is especially suitable for beginners who lack SQL knowledge and developers who prefer a visual approach to database operations.
With its GUI, you can easily manage and operate databases, making your work more efficient.
In essence, it allows you to verify via your browser that functionalities are working correctly and that data has been added, updated, or deleted.
Explanation
The container name can be anything, but avoid duplicates
container_name: "phpmyadmin"Choose any port number you like
I’ve chosen this port number because of conflicts with another project. Feel free to change the number in 8980 to any other number.
  ports:
    - 8980:80
Be careful with the environment variables
    environment:
      - PMA_HOST=db
      - PMA_USER=user
- PMA_PASSWORD=passwordPMA_HOSTshould be the name of the service.PMA_USERshould match theMYSQL_USERof thedbcontainer.PMA_PASSWORDshould match theMYSQL_PASSWORDof thedbcontainer.
For example, if your db container is set up like this:
db:
  container_name: db
  build:
    dockerfile: "./docker/db/Dockerfile"
  ports:
    - 3306:3306
  environment:
    - MYSQL_DATABASE=${DB_NAME:-laravel-docker}
    - MYSQL_USER=${DB_USER:-user}
    - MYSQL_PASSWORD=${DB_PASS:-password}
    - MYSQL_ROOT_PASSWORD=${DB_PASS:-password}
  volumes:
    - "./docker/db/data:/var/lib/mysql"
You will use the following values for phpMyAdmin:
db:
- MYSQL_USER=${DB_USER:-user}
- MYSQL_PASSWORD=${DB_PASS:-password}
Notes
As someone who teaches Laravel, I’m occasionally asked, “How do I implement phpMyAdmin in a production environment?”
I don’t recommend using phpMyAdmin in a production environment
This is my personal opinion.
If you do decide to implement it, make sure to take various security measures to reduce risks. While it is possible to make it more secure through several steps, I personally don’t believe the effort is worth the benefit, which is why I don't recommend it.
Summary
That’s how you can add phpMyAdmin to a Dockerized Laravel project.


