How to Use gatsby-plugin-images
Thank you for your continued support.
This article contains advertisements that help fund our operations.
Table Of Contents
This article summarizes how to use gatsby-plugin-images, a plugin for Gatsby.js.
Overview of the Plugin
This plugin compresses images to make them lighter and also supports lazy loading, which significantly improves the page load speed.
It’s also simpler compared to the previously used plugin, gatsby-image.
Installation Method
Install the necessary plugins via command
npm install gatsby-plugin-image gatsby-transformer-sharp gatsby-plugin-sharp gatsby-source-filesystemAdd to gatsby.config.js
Be careful of plugin duplication and add gatsby-plugin-image.
  plugins: [
    `gatsby-plugin-image`,
    `gatsby-transformer-sharp`,
    `gatsby-plugin-sharp`
    {
      resolve: `gatsby-source-filesystem`,
      options: {
        name: `images`,
        path: `${__dirname}/src/images`,
      },
    },
With this setup, images are stored in the /src/images directory.
How to Use
In your component, import and use it like this:
import { StaticImage } from "gatsby-plugin-image"

~~~
  return (
    <>
        <StaticImage src="../../images/sample.png" alt="" />
    </>
  )
~~~
In my case, it only worked with relative paths.
The documentation says that absolute paths are also supported.
Perhaps it’s due to using Docker for my environment.
How to Change Settings
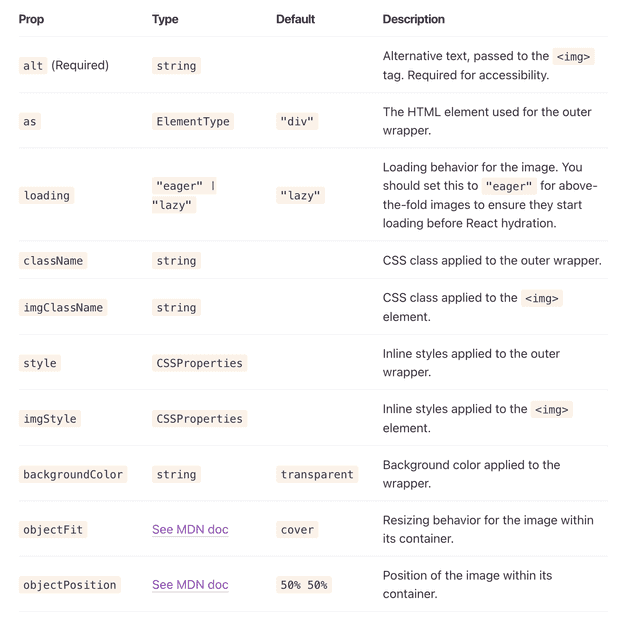
According to the documentation, you can pass various props.
Reference: Documentation (As of 2024/10/03)
<StaticImage src="../../images/sample.png" alt="" objectFit="contain" />Additionally, you can make further adjustments by modifying the settings for gatsby-plugin-sharp.
Here are the changes I made:
Added Compression with AVIF Format
I modified the gatsby-plugin-sharp settings as follows:
{
    resolve: `gatsby-plugin-sharp`,
    options: {
        defaults: {
            formats: [`auto`, `webp`, `avif`], //avif形式を追加
        }
    }
}
Changed Resolution to 100
quality: 100,Display Blurred Image During Lazy Loading
placeholder: `blurred`,
blurredOptions: {
width: 20, // プレー��スホルダー画像の幅
blurAmount: 10, // ぼかしの強さ
toFormat: "png", // フォーマットを指定
},This makes a blurred image appear during lazy loading, and once the image is fully loaded, the compressed version is displayed.
The default black background was a bit odd, but this improved it.
If you reload this page, the photo with messy hair in the side menu should appear blurred at first.
Current Full Settings
Here are my current gatsby-plugin-sharp settings:
    {
      resolve: `gatsby-plugin-sharp`,
      options: {
        defaults: {
          formats: [`auto`, `webp`, `avif`],
          placeholder: `blurred`,
          quality: 100,
          blurredOptions: {
            width: 20, // プレースホルダー画像の幅
            blurAmount: 10, // ぼかしの強さ
            toFormat: "png", // フォーマットを指定
          },
        },
      },
If you want to try more configurations, take a look at the documentation.
Potential Errors
Cache Not Generated
There were cases where the cache wasn’t generated unless I restarted the local server.
Stop the local server and restart it.
If that still doesn’t work, the cache may be corrupted,
gatsby cleanso try deleting the .cache folder and then restarting the local server. That worked for me.
Conclusion
This time, I adjusted the lazy loading behavior of StaticImage.
I also learned that overseas, this display during lazy loading is referred to as the "image placeholder."
It’s a never-ending learning process!


