How to Use GitHub with an M4 Mac (Beginner-Friendly, 2025 Edition)
Thank you for your continued support.
This article contains advertisements that help fund our operations.
Table Of Contents
This article summarizes how to install Git on an M4 Mac, connect it to GitHub, create new projects, and clone existing projects.
関連動画
Related Video
This is a video where we actually tried out the content from the article! If anything is unclear in the article, please check out the video.
The video provides further explanations and demonstrations, so it should be helpful.
Subscribe to Our Channel
If you found this video helpful, please consider subscribing to our channel or giving it a thumbs up! It really motivates us to create more content.
Questions and Feedback
If you have any questions or feedback regarding this article or the video, feel free to leave them in the comment section of the video. Your input is greatly appreciated and will help us improve our content in the future!

The video provides more detailed explanations.
This article is concise and focuses on the essentials. If you find anything unclear, please refer to the video.
Introduction
I recently got an M4 Mac mini, so I’ve compiled the steps I took to set up GitHub and SSH from scratch.
For reference, my macOS version was macOS Sequoia 15.3.1.
Depending on your setup, you may already have some tools installed. Use version-checking commands to skip steps for tools you already have.
How to Connect to GitHub
Git
First, check if the Git command is available.
git -v
git version 2.39.5 (Apple Git-154)
In my case, Git was already available by default.
Register or Log in to GitHub
Go to the signup page to register or log in to access your dashboard.
Create an SSH Key
Run the following command on your PC to generate an encrypted private key and public key.
Eventually, you’ll save the public key on GitHub to establish the connection.
ssh-keygen -t ed25519 -C "[email protected]" -f ~/.ssh/githubReplace [email protected] with your email address.
~/.ssh/github is the file name and save location. You can change this if you prefer a different name.
When you run the command, you’ll be prompted to enter a passphrase. Enter a password of your choice.
If successful, the private key will be generated.
ls ~/.ssh/Running this command will show that the files github and github.pub have been created.
Copy the contents of the public key github.pub.
cat ~/.ssh/github.pub | pbcopyUse this command or similar to copy the key.
Register the Public Key on GitHub
Click your profile icon in the top-right corner and select "Settings" from the menu.
On the next screen:
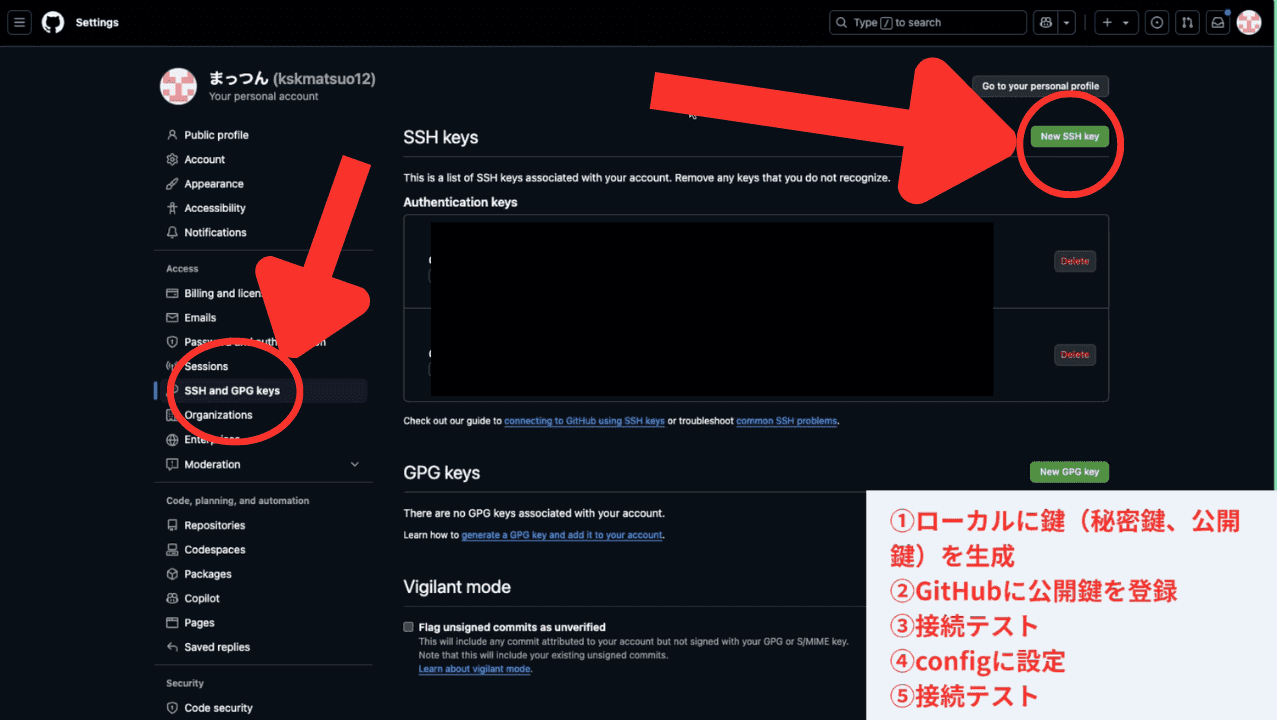
As shown in the image, select SSH and GPG keys from the left menu, then click New SSH Key.
- Title: Enter any name you like.
- Description: Optional (can be left blank).
- Key: Paste the public key you copied earlier (the email address part is optional).
Test the Connection via Command
eval "$(ssh-agent -s)"
ssh-add ~/.ssh/github
You’ll be prompted for a password. Enter the passphrase you set when generating the key and press Enter.
These commands start the SSH agent and prepare it to register the private key.
This setup allows you to connect to remote servers like GitHub via SSH without entering the passphrase every time.
ssh -T [email protected]

You've successfully authenticated, but GitHub does not provide shell access.
If you see this message, the connection is successful.
Add Configuration to config
The SSH agent setup mentioned earlier requires you to re-run the commands every time you restart the terminal. To avoid this, add the configuration to the config file for automatic connection.
vim ~/.ssh/configOpen Vim, press A to enter insert mode, and add the following:
Host github.com
HostName github.com
User git
IdentityFile ~/.ssh/github
AddKeysToAgent yes
UseKeychain yes
Ensure proper indentation and line breaks.
After editing, press ESC to exit insert mode, then type :wp to save.
Finally, test the connection again:
ssh -T [email protected]

You've successfully authenticated, but GitHub does not provide shell access.
If the connection is successful, you’re all set.
How to Create a New Project and Upload It to GitHub
Create a Project Directory
First, create a project directory using VS Code or similar, and create files like index.html as needed.
Create a New Repository on GitHub
On GitHub, click your profile icon → "Your Repositories" → "New" to go to the new repository creation page.
Enter a repository name, choose Public or Private, and click the create button.
You’ll see a list of commands. Follow them, but here are the essential ones:
Navigate to your project directory.
Make sure to run the following commands from the root directory of your project.
git init
git add .
git commit -m "first commit"
git remote add origin [email protected] ~~~~
git push origin head
For the remote add command, copy it from the list of commands displayed on GitHub.
If all commands run successfully, refresh the GitHub repository page to see your project uploaded.
How to Clone an Existing Project from GitHub
Click the green "Code" button in the top-right corner of the repository page.
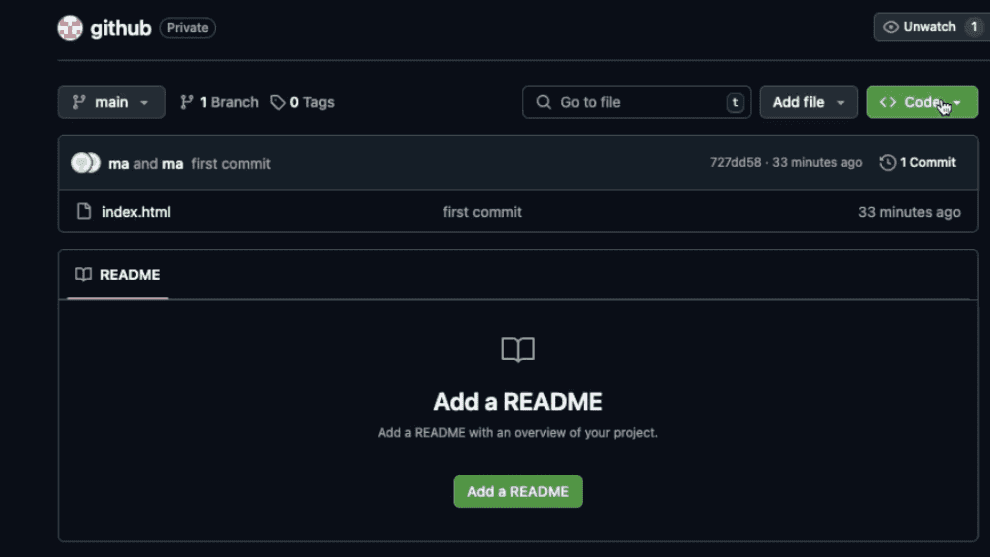
You’ll see tabs for HTTPS, SSH, etc. Select the "SSH" tab and copy the URL.
Navigate to the directory where you want to clone the project and run:
git clone [email protected]:**************Replace [email protected]:************** with the copied URL. This will clone the repository.
You can clone public repositories or private repositories where you have access permissions.
Other Issues and Solutions
Here are some additional issues I encountered with the initial setup of the M4 Mac:
Terminal Commands Not Working
How to Fix 'xcode-select: note: No developer tools were found, requesting install'
Installing Homebrew Was a Bit Tricky?
How to Install Homebrew on an M4 Mac (2025 Edition)
That’s all! I hope this helps someone.


