How to Introduce Vuex in Laravel
Thank you for your continued support.
This article contains advertisements that help fund our operations.
Table Of Contents
An article on how to introduce Vuex in Laravel
What is Vuex?
Vuex is a state management pattern and library for Vue.js applications. It provides a centralized store for all the components, including shared state and actions.
It is similar to global variables and functions in JavaScript, or the Context API and Redux in React.
Personally, I think data management should be as self-contained as possible within a page, with data handled by the parent component and passed down to child components.
However, there are cases where the same data needs to be accessed across multiple components or pages, or when data needs to be modified from various parts of the application.
Benefits of Vuex
- Reduces the number of times data needs to be retrieved since it can be reused after a single fetch.
- Reduces repetitive code when the same data is used across multiple components.
Drawbacks of Vuex
- It can be difficult to determine where code that accesses and updates Vuex is located, so it requires additional management.
Due to this significant drawback, I recommend using Vuex only when there is a clear reason to do so.
Introducing Vuex
Install Vuex via Command
First, install Vuex using the following command:
npm install vuexCreate Necessary Files
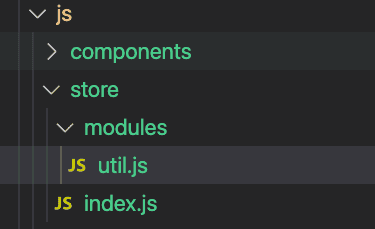
Create the following structure with js/store/index.js and js/store/modules/util.js.
The second file is named util in this example, but naming it something that indicates its function is better.
Write Code in Each File
Now, let's write the code for each file.
Vue 3
js/store/index.js:
import { createStore } from "vuex"

export default createStore({
  modules: {
    util,
  },
})js/store/modules/util.js:
const getters = {}

const state = {
  text: "This is some text",
}

const mutations = {}

const actions = {}

export default {
  namespaced: true,
  getters,
  state,
  mutations,
  actions,
}
Vue 2
js/store/index.js:
import Vue from "vue"
import Vuex from "vuex"
import util from "./modules/util"

Vue.use(Vuex)

export default new Vuex.Store({
  modules: {
    util,
  },
})
The content of js/store/modules/util.js is the same.
Write in resources/js/app.js
Add the following to resources/js/app.js.
Vue 3
Below is the full content for an Inertia setup. You just need to use use(store) with createApp, so this also works when not using Inertia.
import { createApp, h } from "vue"
import { createInertiaApp } from "@inertiajs/vue3"
import { resolvePageComponent } from "laravel-vite-plugin/inertia-helpers"
import { ZiggyVue } from "../../vendor/tightenco/ziggy"

import store from "./store" // Add this line

// Vuetify
import "@mdi/font/css/materialdesignicons.css"
import "vuetify/styles"
import { createVuetify } from "vuetify"
import * as components from "vuetify/components"
import * as directives from "vuetify/directives"

const vuetify = createVuetify({
  components,
  directives,
})
// Vuetify

const appName = import.meta.env.VITE_APP_NAME || "Laravel"

createInertiaApp({
  title: title => `${title} - ${appName}`,
  resolve: name =>
    resolvePageComponent(
      `./Pages/${name}.vue`,
      import.meta.glob("./Pages/**/*.vue")
    ),
  setup({ el, App, props, plugin }) {
    return createApp({ render: () => h(App, props) })
      .use(vuetify)
      .use(plugin)
      .use(ZiggyVue)
      .use(store) // Add this line
      .mount(el)
  },
  progress: {
    color: "#4B5563",
  },
})
Vue 2
import vuetify from "./vuetify"
import router from "./router"
import AppComponent from "./components/AppComponent.vue"
import store from "./store" // Add this line

const app = new Vue({
  el: "#app",
  store, // Add this line
  router,
  vuetify,
  components: {
    "app-component": AppComponent,
  },
})
That's it!
(If you are unfamiliar with app.js, check ⇨ this article)
How to Use (Verification)
You can verify the setup by outputting the following code in any component:
<template>
  <div>{{ $store.state.util.text }}</div>
</template>
Enjoy using Vuex!
Conclusion
These are the steps for integrating Vuex into a Laravel project.
For Vue 3, there is also an option to use Pinia, so feel free to explore that if you're interested.


