An Easy Way to Set Up a Laravel Environment [For Beginners]
Thank you for your continued support.
This article contains advertisements that help fund our operations.
Table Of Contents
Introducing an easy way to set up a Laravel environment.

Introduction
There are slight differences between Mac and Windows setups.
This article mainly focuses on Mac, but the overall procedure is the same, and I personally recommend setting up the environment this way.
Why I Recommend This Method
- Setting up with MAMP or XAMPP often causes issues (CSS changes take time to reflect, cache resets are troublesome, etc.).
- Docker can be difficult at first, and many give up on Laravel before even getting it to work.
If you want to try setting up your environment with Docker, I have explained it in a video in the following article:
How to Set Up a Laravel 11 Development Environment with Docker (Video Available)
Overview of the Steps
- Install PHP on your local machine.
- Install Composer.
- Install Laravel.
- Set up a database using MAMP or XAMPP.
Installing Homebrew
Homebrew is used to install PHP.
Commands starting with brew, such as brew install php, can be used once Homebrew is installed.
You can install it easily by running the command provided on the Homebrew official page:
/bin/bash -c "$(curl -fsSL https://raw.githubusercontent.com/Homebrew/install/HEAD/install.sh)"If the installation is successful, you can check the version with the following command:
brew -vExample output:
Homebrew 4.0.3Installing PHP
Run the following command to install the latest version of PHP:
brew install phpIf you want to install a specific version, use:
brew install [email protected]To check the available versions:
brew search phpAfter installation, verify it by running:
php -vIf the PHP Version is Incorrect or Outdated
Your system might be loading a different PHP version.
For macOS Catalina or later (using zsh), update the path:
echo 'export PATH="/usr/local/opt/[email protected]/bin:$PATH"' >> ~/.zshrc
echo 'export PATH="/usr/local/opt/[email protected]/sbin:$PATH"' >> ~/.zshrc
Restart the terminal and check:
php -vIf the Version Still Doesn't Change
brew services start [email protected]If It Still Doesn't Work
brew link php8.2After this, PHP should be installed correctly.
Installing Composer
Composer is a package manager for PHP, similar to Homebrew.
Follow the steps on the official Composer page and run the following commands:
php -r "copy('https://getcomposer.org/installer', 'composer-setup.php');"
php -r "if (hash_file('sha384', 'composer-setup.php') === 'dac665fdc30fdd8ec78b38b9800061b4150413ff2e3b6f88543c636f7cd84f6db9189d43a81e5503cda447da73c7e5b6') { echo 'Installer verified'.PHP_EOL; } else { echo 'Installer corrupt'.PHP_EOL; unlink('composer-setup.php'); exit(1); }"
php composer-setup.php
php -r "unlink('composer-setup.php');"
Move the installed file to a system-wide location:
sudo mv composer.phar /usr/local/bin/composerEnter your system password when prompted.
Installing MAMP
MAMP includes PHP, MySQL, and phpMyAdmin in one package.
Download it from the MAMP download page and install it.
For Windows users, XAMPP is recommended.
After installation, start MAMP and open phpMyAdmin via MySQL → phpMyAdmin.
Installing Node.js
Node.js is needed for JavaScript-related packages.
Download it from the official Node.js page and install the LTS version.
Verify installation:
node -vRunning Laravel Commands
Installing Laravel and Starting a Local Server
Navigate to the desired directory in the terminal:
cd ~/DesktopThen run:
composer create-project laravel/laravel example-app
cd example-app
php artisan serve
If the server starts successfully, your Laravel environment is set up.
Connecting to the Database
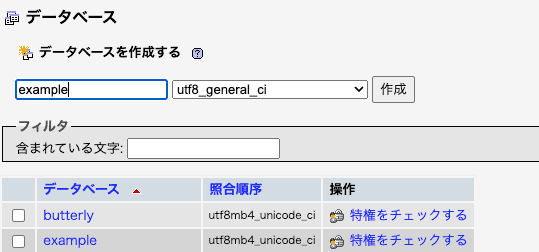
In phpMyAdmin, create a new database with utf8mb4_unicode_ci.
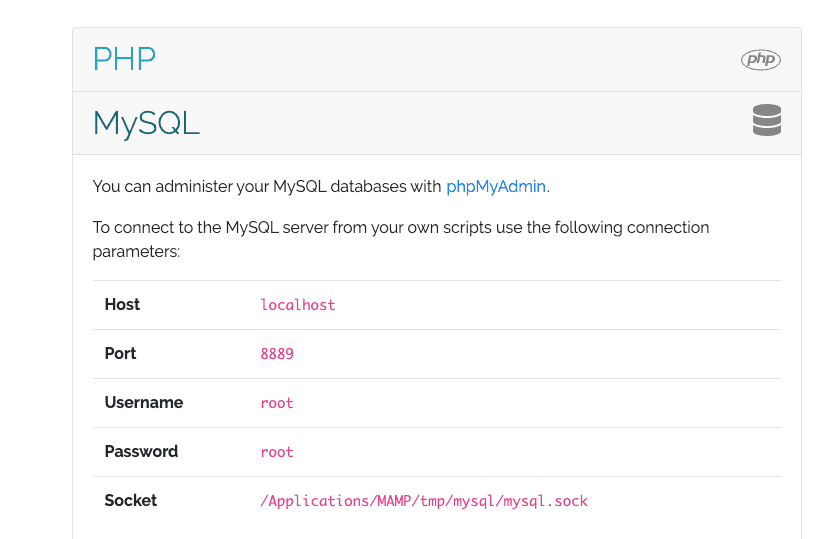
Find the database connection details from MAMP:
Update the .env file in your Laravel project with these details:
DB_CONNECTION=mysql
DB_HOST=localhost
DB_PORT=8889
DB_DATABASE=example
DB_USERNAME=root
DB_PASSWORD=root
Run the following command to apply migrations:
php artisan migrateIf Database seeding completed successfully. appears, the database is connected, and the environment setup is complete.
Conclusion
What is MAMP (or XAMPP)?
MAMP provides a ready-to-use environment with PHP, MySQL, and phpMyAdmin, making setup much easier.
Without it, installing and configuring MySQL and phpMyAdmin manually would be tedious.
Using MAMP or XAMPP streamlines the setup process, allowing you to focus on Laravel development.


