How to Test Email Sending Using Mailtrap in Laravel
Thank you for your continued support.
This article contains advertisements that help fund our operations.
Table Of Contents
This post summarizes how to test email sending using Mailtrap in Laravel development.
What is Mailtrap?
Mailtrap is an email delivery platform for individuals and businesses that allows testing, sending, and managing email infrastructure all in one place.
It's easy to implement email sending tests in Laravel, and I find it to be a good match for Laravel development.
Setting Up Email Sending in Laravel
Log in to the Mailtrap Official Site
Please log in from the login page.
If you haven't registered yet, you need to sign up, but it's quick if you use SNS login.
Get the Necessary Information for Configuration After Logging In
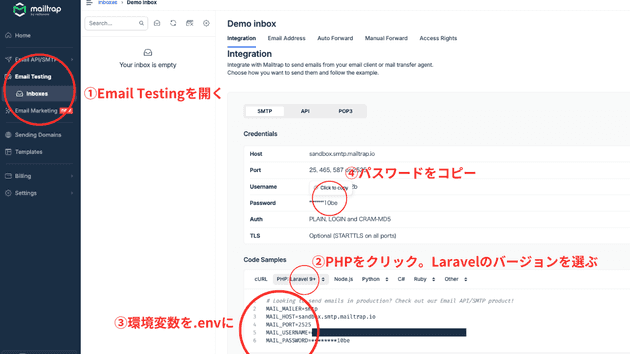
- Open Email Testing from the left menu.
- Click on PHP and select the Laravel version.
- Copy the environment variables and paste them into your Laravel project's
.envfile. - Copy the password and paste it into the relevant section of the
.envfile.
This completes the configuration.
Additional Information on .env
Skip this section if you're already familiar.
In the root directory of your Laravel project, there is a file named .env.
When you open it, by default, it contains:
MAIL_MAILER=log
MAIL_HOST=127.0.0.1
MAIL_PORT=2525
MAIL_USERNAME=null
MAIL_PASSWORD=null
MAIL_ENCRYPTION=null
MAIL_FROM_ADDRESS="[email protected]"
MAIL_FROM_NAME="${APP_NAME}"
You need to overwrite the necessary parts with what you copied from the Mailtrap management screen.
For the password, copy it from the management screen again and replace it:
MAIL_MAILER=smtp
MAIL_HOST=sandbox.smtp.mailtrap.io
MAIL_PORT=2525
MAIL_USERNAME=exampleexample
MAIL_PASSWORD=secretsecret10abc
After finishing editing the .env, run:
php artisan config:clearto apply the settings.
Testing Email Sending
With the previous settings completed, this section contains experimental code for sending emails, which may be unnecessary for many people.
Therefore, if you're considering features like email verification, please refer to:
→ How to Implement Email Verification Using Laravel Jetstream (Fortify)
Creating a Command
To create a command, run the following command to generate a command file for configuration.
php artisan make:command TestMailCommandThis command will generate the file app/Console/Commands/TestMailCommand.php, so please open that file.
protected $signature = 'app:test-mail-command';This is set so that when you run:
php artisan app:test-mail-commandthat class will be executed.
Let's write a class to send a test email. This email class will be created in the next section.
use Mail;
use App\Mail\TestMail;

//~~~略~~~~
public function handle()
{
Mail::to('[email protected]')->send(new TestMail);
}
Creating the Email Sending File
Run the command to create the email class.
php artisan make:mail TestMailWhen you run this command, the file app/Mail/TestMail.php will be generated, so please open it.
The content() method specifies the file to display the email, so rewrite it as follows:
public function content(): Content
{
return new Content(
view: 'emails.test',
);
}
Creating the View File
Create and edit resources/views/emails/test.blade.php.
<!DOCTYPE html PUBLIC "-//W3C//DTD HTML 4.01 Transitional//EN" "http://www.w3.org/TR/html4/loose.dtd">
<html xmlns="http://www.w3.org/1999/xhtml" xmlns="http://www.w3.org/1999/xhtml">
  <head>
    <meta http-equiv="Content-Language" content="ja" />
    <meta http-equiv="Content-Type" content="text/html; charset=UTF-8" />
    <meta name="viewport" content="width=device-width, initial-scale=1.0" />
    <title>Test Email</title>
  </head>

  <body style="-webkit-text-size-adjust:100%">
    <div>Test Email</div>
  </body>
</html>
Running the Command
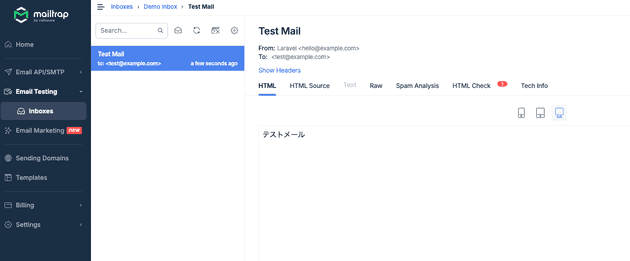
php artisan app:test-mail-commandIf it completes without errors, please return to the Mailtrap management screen.
If it has been sent successfully as shown in the image, you can confirm that the setup is complete.
Verifying the operation was more challenging than setting up Mailtrap.
Conclusion
This post explained how to test email sending using Mailtrap.
The email sending system itself is fortunately easy to implement, but writing HTML can be quite challenging.
Even if it works well in the development environment, the design can easily break depending on the settings of the recipient.
Instead of awkwardly designing with CSS, I think it is more practical to create and attach images to make a stylish email.


