How to Create a Database with Laravel (Migration)
Thank you for your continued support.
This article contains advertisements that help fund our operations.
Table Of Contents
This article summarizes how to create a database with Laravel migration.
Laravel provides a migration system that allows you to easily create databases.
Introduction
Laravel has a migration system.
Migration is a feature that controls the version of the database.
Without this migration, for example, if you want to share a database locally, you would have to manually create the exact same database.
Migration resolves this issue.
This article is a summary of the "Migration" article in the Laravel official documentation.
https://readouble.com/laravel/6.x/ja/migrations.html
Prerequisites
You need to have Laravel already installed.
Creating a database with MAMP
(In general, as long as you specify the correct port locally, the Laravel configuration will be the same wherever you create the database.)
⇨ Setting up Laravel with MAMP
⇨ Wrote an article specifically focused on database connection methods
⇨Article on setting up Laravel+Vue here
Steps to Create a Database
Creating a Database in MAMP's phpMyAdmin
Click on "New" at the top of the left menu in phpMyAdmin.
Then, on the right screen, enter the following:
Database name: test_db
Type: utf8mb4unicodeci← the second one from the bottom
(Refer to the image)
Press create, and an empty database will be created.
"test_db" that you entered will be the database name.
The number written at the top, 8889, is the port number.
That's all for the phpmyadmin screen operation.
Editing the .env File in Laravel
The .env file is located in the root directory of the Laravel project.
(The root directory is the top directory of the Laravel project.)
DB_CONNECTION=mysql
DB_HOST=127.0.0.1
DB_PORT=8889
DB_DATABASE=test_db
DB_USERNAME=root
DB_PASSWORD=root
Set the table name, port, username, and password you just created.
As MAMP's default configuration is "root" for username and password, write it as above.
Run the command
php artisan config:clearto reflect the changes in the env file.
Connection Check
Laravel comes with several migration files from the beginning.
So, let's check if the connection can be made using those files.
Just one command.
php artisan migrateIf it looks like the image, then it's OK.
If it doesn't work, there might be a mistake in one of the steps. Please check.
Creating a Migration File
Create a migration file.
This time, we will create a "posts" table.
It's just one command.
php artisan make:migration create_posts_tableIf successful, the file should have been created in the database/migrations folder.
The commands around here are written as they are in the official documentation.
Editing the Migration File
When you open the created migration file, you will see various things written initially.
So, try adding something like this in the existing content:
Schema::create('posts', function (Blueprint $table) {
    $table->bigIncrements('id');
    $table->string('title');
    $table->string('contents');
    $table->timestamps();
});
Except for the 3rd and 4th lines, the rest was already written.
We are creating two columns, title and contents.
After creating the migration file, run
php artisan migrateto create the table.
If you see logs like below, then it's OK.
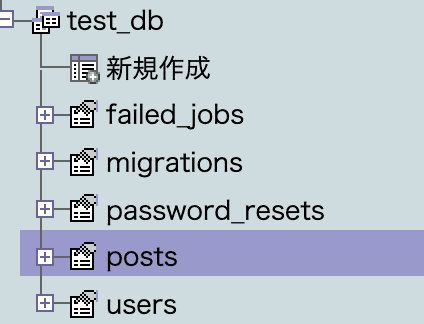
Finally, check the content in phpMyAdmin. If the "posts" table is created as shown in the image below, then it's OK.
Introduction of Useful Tools
Tools that allow you to create database designs and migration files simultaneously
When designing a database, you create an ER diagram, and if you create that ER diagram, this tool will simultaneously output the migration file needed to create the database.
An ER diagram looks like the image below.
⇨Article on how to use the tool
It's very convenient.
Especially in the initial stages of product development, it is very useful.
Conclusion
With this, you can create a database using Laravel migration.
I plan to continuously update and link to more detailed content, so please visit the blog from time to time.
Thank you for reading until the end.


