How to Restrict IP Access to the Login and Admin Dashboard of a WordPress Site
Thank you for your continued support.
This article contains advertisements that help fund our operations.
Table Of Contents
This article summarizes how to restrict IP access to the login and admin dashboard (WordPress Dashboard) of a WordPress site hosted on a rental server.
関連動画
Related Video
This is a video where we actually tried out the content from the article! If anything is unclear in the article, please check out the video.
The video provides further explanations and demonstrations, so it should be helpful.
Subscribe to Our Channel
If you found this video helpful, please consider subscribing to our channel or giving it a thumbs up! It really motivates us to create more content.
Questions and Feedback
If you have any questions or feedback regarding this article or the video, feel free to leave them in the comment section of the video. Your input is greatly appreciated and will help us improve our content in the future!
Conclusion
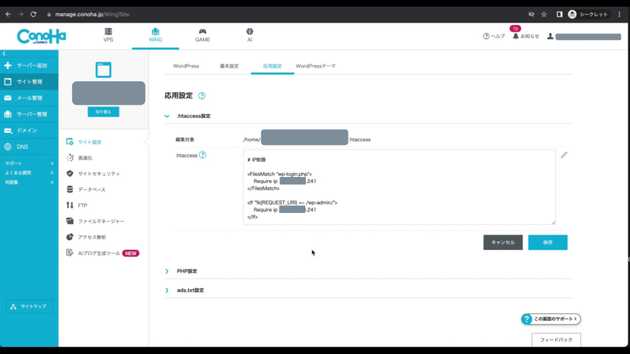
Open .htaccess and add the following content:
<FilesMatch "wp-login.php">
    Require ip ***.**.***.***
</FilesMatch>

<If "%{REQUEST_URI} =~ /wp-admin/">
    Require ip ***.**.***.***
</If>
Replace
***.**.***.***
with the IP you want to allow.
About Security
The Necessity of Protection
The more valuable the information that could be obtained from the admin dashboard, the more necessary security measures become.
For example, this site that you're currently visiting has no sensitive information, so getting hacked wouldn’t be a major issue.
On the other hand, if you’re dealing with customer services or corporate websites that handle personal information, it becomes critical to implement such measures to prevent potential damage.
- Protection of customer information
- Protection of posts/articles
- Recovery efforts after a breach
- Revenue loss during recovery
- Malicious redirects
- (Due to the above) A drop in domain reputation
Challenges of Implementing Security Measures
While spending more time on security measures can increase effectiveness, it also comes with higher costs in terms of:
- Implementation cost
- Maintenance cost
Therefore, it’s important to choose measures that provide a good balance of effectiveness with minimal effort.
The IP restriction method mentioned here is simple to implement but may be less suitable for those working in situations like:
- Remote work or access by many people
- Working from a home or office with a fluctuating IP address
In such cases, the "maintenance cost" becomes higher, and this method may not be recommended.
The implementation, however, is straightforward.
IP restrictions do not guarantee 100% security
When it comes to security, a multi-layered defense approach is essential, so relying on just one method won't provide complete protection.
For example, it is theoretically possible to change an IP address using a VPN, meaning that bypassing IP restrictions is possible.
However, spoofing an IP address requires significant effort, and it would be difficult to try an arbitrary number of IPs.
Additionally, successful communication requires receiving responses, so in this case, IP restrictions should be quite effective.
Location of .htaccess
If Using ConoHa WING
- From the top menu, select "WING"
- From the left menu, select "Site Management"
- From the second menu on the left, select "Site Settings"
- In the top menu of the main screen, select "Advanced Settings"
- Select ".htaccess Settings"
- You can edit by clicking the edit icon
Other Rental Servers
Other servers may also allow you to perform this operation through their control panel, but since I can’t verify them all, I’ll provide the general method below.
The file you need to edit is located in the root directory of your WordPress installation.
Using an FTP client or similar tool, you can edit the .htaccess file found here:
WordPress Root Directory
├── wp-admin/
├── wp-content/
├── wp-includes/
├── .htaccess ← This one
├── index.php
├── license.txt // etc.
Configuration and Explanation
Once you’ve opened .htaccess, add the following content:
<FilesMatch "wp-login.php">
    Require ip ***.**.***.***
</FilesMatch>

<If "%{REQUEST_URI} =~ /wp-admin/">
    Require ip ***.**.***.***
</If>
Explanation
Require ip ***.**.***.***The above command allows the specified IP to access the site.
<FilesMatch "wp-login.php">
    Require ip ***.**.***.***
</FilesMatch>
The above command blocks access to the login page.
<If "%{REQUEST_URI} =~ /wp-admin/">
    Require ip ***.**.***.***
</If>
The above command blocks access to URLs starting with wp-admin/.
Allowing Multiple IPs
There are various ways to achieve this, but listing the IPs vertically tends to be the most readable.
    Require ip ***.**.***.***
    Require ip ***.**.***.***
When Settings Are Successful
If you see the following message when trying to connect from an unauthorized IP, the setup was successful:
Forbidden
You don’t have permission to access this resource.
Other Security Measures
There are many possible security measures, but the fundamental principles are: "Don’t store sensitive information," "Make it appear as though there is no sensitive information," and "Reduce the cost-effectiveness for attackers."
The goal is to make the attack seem not worth the effort.
One of the most effective measures, in my opinion, is:
-
Two-factor authentication for logins
Two-factor authentication using apps like Authenticator or SMS is becoming widespread.
If someone gains access to your hosting control panel, they can take everything, so you must be extremely cautious with your hosting login credentials.
The rental server I use, ConoHa WING , allows for easy security settings through the control panel.
It’s also affordable, so if you’re unsure which hosting service to use, you might want to consider it.
Issues That Occurred with This Method
I was unable to make changes to "Theme Customization" → "CSS, function.php" in the WordPress admin panel.
Since theme customization from the admin panel is rarely performed frequently, I temporarily disabled the setting, made the updates, and then re-enabled it.
It might be better not to implement this setting during the theme customization phase.
Conclusion
If you have any concerns about security measures, feel free to reach out for advice.


