How to Insert Ads (Such as Google AdSense) Inside Posts in the WordPress Theme “SANGO”
Thank you for your continued support.
This article contains advertisements that help fund our operations.
Table Of Contents
This article explains how to insert ads (such as Google AdSense) inside your posts when using the WordPress theme “SANGO.”
When searching online, I could only find fragmented information, so I decided to compile everything into one complete guide.
Prerequisites
- The WordPress theme “SANGO” is already installed.
- You have obtained the ad code you want to insert.
Insert the Ad Code into the In-Post Ad Widget
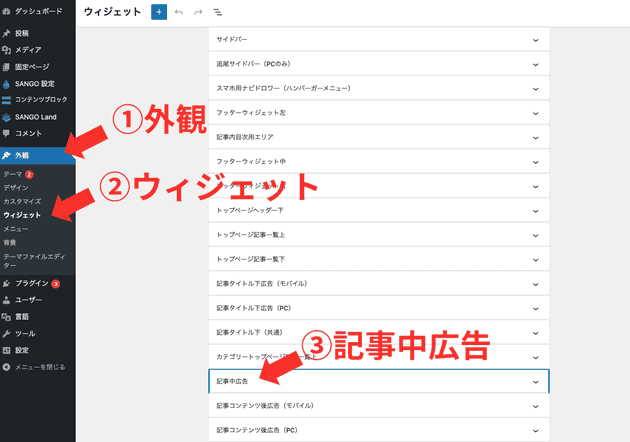
Location of the In-Post Ad Widget
- Log in to your WordPress dashboard.
- From the left menu, go to “Appearance.”
- Then select “Widgets.”
- Click “In-Post Ads.”

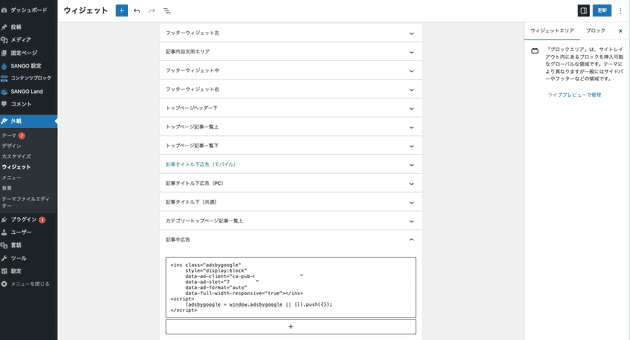
Paste the Ad Code and Save
- Add a new block: “Custom HTML.”
- Paste your ad code.
- Click “Update.”

If you’re using Google AdSense, your code will look something like this:
<ins class="adsbygoogle"
  style="display:block"
  data-ad-client="ca-pub-***********"
  data-ad-slot="************"
  data-ad-format="auto"
  data-full-width-responsive="true"></ins>

<script>
     (adsbygoogle = window.adsbygoogle || []).push({});
</script>
Choose Where the Ad Appears in the Article
Now that you’ve configured the widget, by default, the ad will appear right before the first h2 heading in your post.
To change where the ad appears:
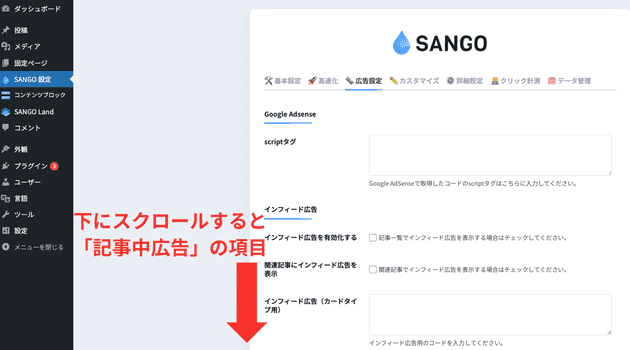
- From the left menu, go to “SANGO Settings.”
- Open the “Ad Settings” tab.
- Scroll down to the “In-Post Ads” section and choose where you want the ads to appear.
If you want ads to appear before every h2 heading, check both “Odd” and “Even.”

That’s all you need to insert in-post ads in SANGO!
What Is an Ad Code?
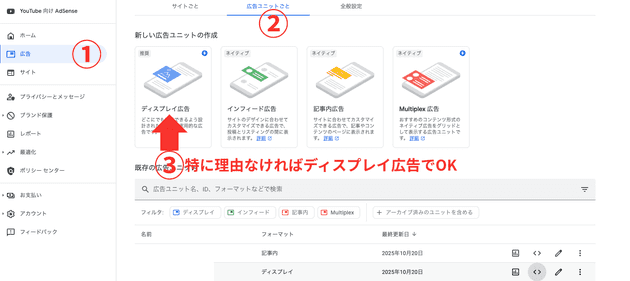
For Google AdSense
Most users will likely use Google AdSense.
- From the left menu, go to “Ads.”
- Select the “By ad unit” tab at the top.
- Choose either “Display ads” or “In-article ads.”
After naming your ad unit, the code will be displayed.

By the way, the <script> portion of the generated code should already be included in your site’s <head> section from your AdSense setup, so you can omit it.
You’ll see something like this:
<script async src="https://pagead2.googlesyndication.com/pagead/js/adsbygoogle.js?client=ca-pub-**************"
     crossorigin="anonymous"></script>

<ins class="adsbygoogle"
  style="display:block"
  data-ad-client="ca-pub-*********"
  data-ad-slot="************"
  data-ad-format="auto"
  data-full-width-responsive="true"></ins>

<script>
     (adsbygoogle = window.adsbygoogle || []).push({});
</script>
You can remove this part:
<script
  async
  src="https://pagead2.googlesyndication.com/pagead/js/adsbygoogle.js?client=ca-pub-**************"
  crossorigin="anonymous"
></script>
You only need this:
<ins class="adsbygoogle"
  style="display:block"
  data-ad-client="ca-pub-*********"
  data-ad-slot="************"
  data-ad-format="auto"
  data-full-width-responsive="true"></ins>

<script>
     (adsbygoogle = window.adsbygoogle || []).push({});
</script>
For Amazon Affiliate or Rakuten Affiliate
In the “Paste and Save Ad Code” section, we used the “Custom HTML” block. If you’re using the WordPress plugin Rinker, you can instead insert a “Rinker Block” in place of the Custom HTML block.
For A8.net or Other ASPs
Choose the ad you’ve partnered with, copy the provided code (e.g., via “Copy Material”), and paste it into a Custom HTML block.
Although the code may look long, it’s usually just an “image with a parameterized link.”
Summary
This particular site isn’t built on WordPress, but I use SANGO on another website I manage. It’s lightweight, simple, and works perfectly out of the box — one of my favorite themes.


